
MAC Address Registration
For Mac OSX instructions, click here.
Windows Instructions
Before you can connect to the Indiana University network with a computer or wireless device, you must register its MAC address. Otherwise, you cannot receive an IP address from the campus DHCP service. The purpose of the MAC address is to uniquely identify each and every item on a network. Every computer has a unique MAC address.
To successfully register the MAC address of your wireless computer, please observe the following caveats:
- Do not make a VPN connection because the registration site won’t be able to see your MAC address if you do.
- On the computer you wish to register, make sure you aren’t connected to the network with a data cable. Near the clock in the lower right hand corner, locate the Wireless card icon. It looks like a pc with radio waves coming from it but currently has a small red x below it.
![]()
Double click on it. A list of available networks is shown.
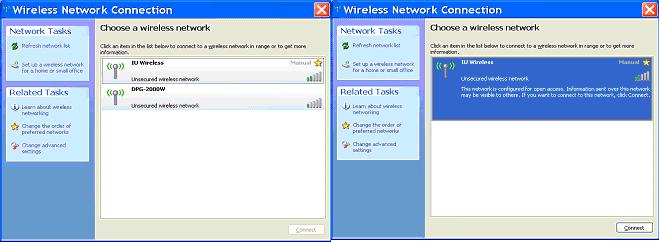
Click on IU Wireless and then click on Connect.
It will attempt to connect….
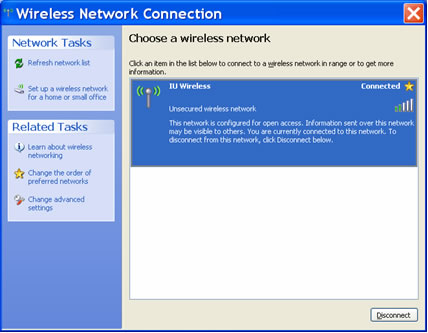
When it connects, the status beside the gold star will change to Connected.
(Note: the Wireless icon near the clock has lost its red x as well.)
Once you’ve observed the items above, do the following:
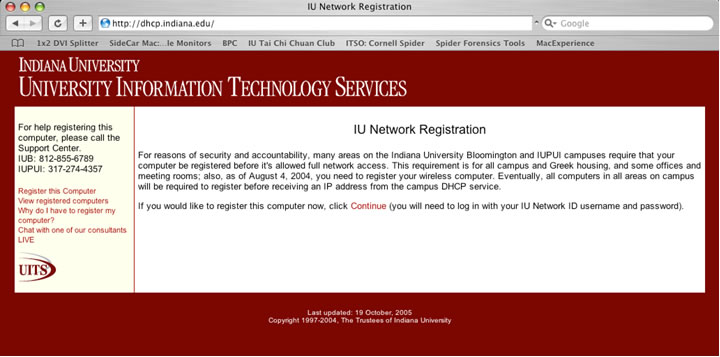
- Launch your Internet browser and go to: http://dhcp.indiana.edu/Note: Microsoft Internet Explorer for Mac does not work at the above site; you might use Safari.
- Follow the instructions on the page.
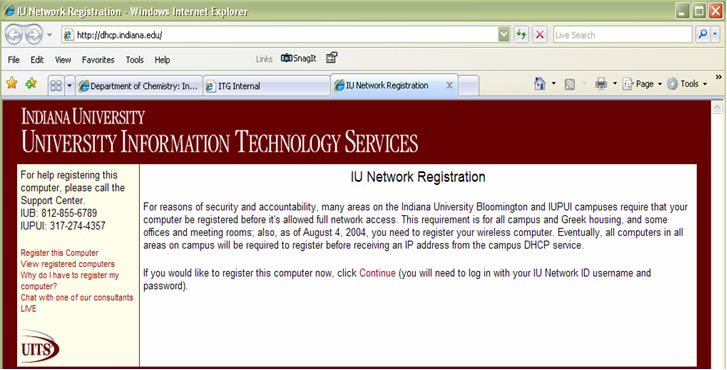
When you click on Continue, this window will appear: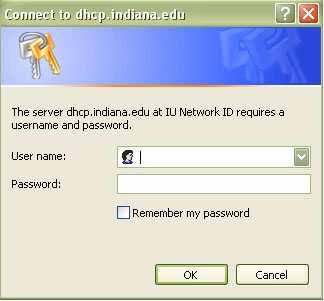
Log in with your IU Network ID username and password. - It is important that you wait five minutes and then restart your computer; you may not receive a good IP address until you do.
Now you will need to set up a VPN Connection.
To install the latest VPN client please do the following. (These instructions are for Windows only.)
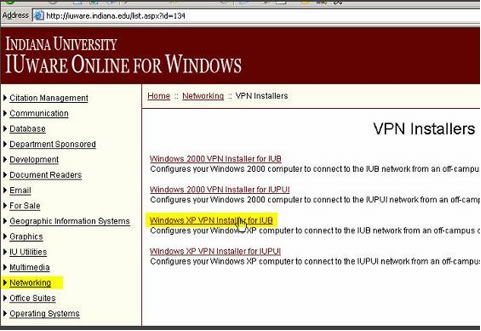
- Go to http://iuware.indiana.edu
- Click Networking -> VPN Installers -> Windows XP VPN Installer for IUB -> Download
- Accept the defaults
- You will now find the VPN Client in
Start > Connect To > IUB VPN Connection
or
Start > Control Panel > Network Connections > IUB VPN Connection - When you launch it you will see the following
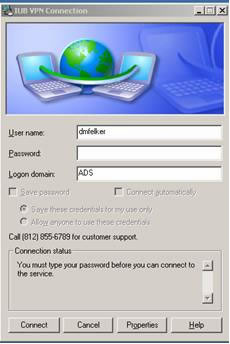
- Enter your IUB Password
Select Save Password if you wish.
Select Connect Automatically if you wish to prevent having to click connect in the future.
Click Connect. - You should see in the 2 computers with a cloud icon in your task manager

OSX Instructions
Before you can connect to the Indiana University network with a computer or wireless device, you must register its MAC address. Otherwise, you cannot receive an IP address from the campus DHCP service. (The purpose of the MAC address is to uniquely identify each and every item on a network. Every computer has a unique MAC address.)
To successfully register the MAC address of your wireless computer, please observe the following caveats:
- Do not make a VPN connection because the registration site won’t be able to see your MAC address if you do.
- On the computer you wish to register, make sure you aren’t connected to the network with a data cable. Locate your wireless card in the upper right hand corner of your screen near your clock, and make sure you can see the IU Wireless Network.
- Launch your Internet browser and go to: http://dhcp.indiana.edu/
Both Safari and Firefox will work for this.Note: Microsoft Internet Explorer for Mac does not work at the above site; you might use Safari. - Read the instructions on the page.
As the instructions state, you will need to click the red Continue link to register your MAC Address.
When you click on Continue, this window will appear:
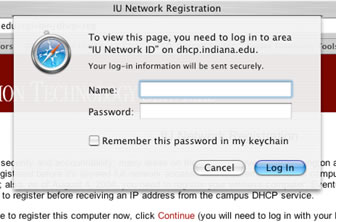
Log in with your IU Network ID username and password.
- It is important that you wait five minutes and then restart your computer; you may not receive a good IP address until you do.
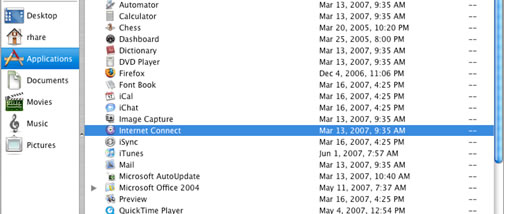
Now you will need to set up a VPN Connection. Open the Internet Connect program located in your applications.
Select VPN (L2TP), and in the “Server address:” line type in: ipsec.indiana.edu
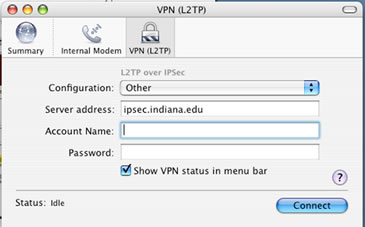
The Account Name and Password are your IU Network ID username and password. Before you can connect you need to save and edit the connection.
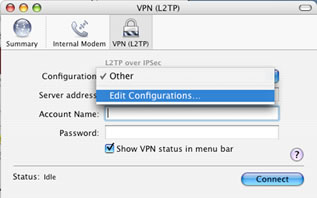
Click to pull down the Configuration scroll bar to select “Edit Configuration”.
You will be prompted to save the VPN, it is best to do so and to label the VPN with something that makes it easy to remember, such as IU Wireless, IU, or IU VPN.
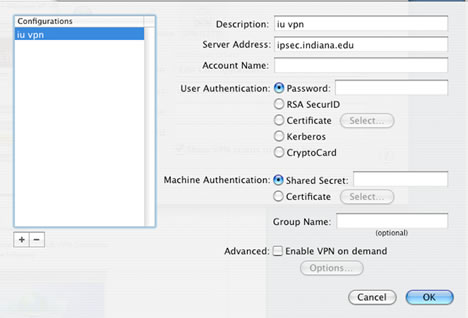
Again, here you can see the Account Name and Password, these are the same as before, and should be your IU username and password. To make the VPN work, you will need to input the Shared Secret, which is:
hermanbwells
All one word, and lowercase. With the secret added, click OK. This will return you to the previous window. To make connecting easier it is advisable to make sure the “Show VPN status in menu bar” check box is checked. You can now click “Connect” and connect to the IU Network.
The connection progress should be displayed in the menu bar.