Plotter Instructions
HP Designjet Z6100ps
- Click file, select “Print”
- Select the SRC HPZ6100 PS 42 inch printer on bl-chem-iso
- Click on Printer Properties
- On the Advanced Tab, select: PostScript Custom Page Size
- Set the Width to 42 inches, set the Height to 56 or 60 inches
- On the Paper/Quality tab, increase the quality, and check “Landscape”
- Click “OK” to close the properties window. You can now click print to send your poster to the plotter.
Common Problems
Solution: You can try changing the format of your poster, try saving your poster as a
.ppt instead of a .pptx. You can also try saving your poster as a .pdf.Solution: Add some margin to your poster in power point. the plotter needs about 3/8 inch margins. also check the orientation of your poster to unsure it is printing correctly.
or call 856-4124.
Plotting at Wells Library
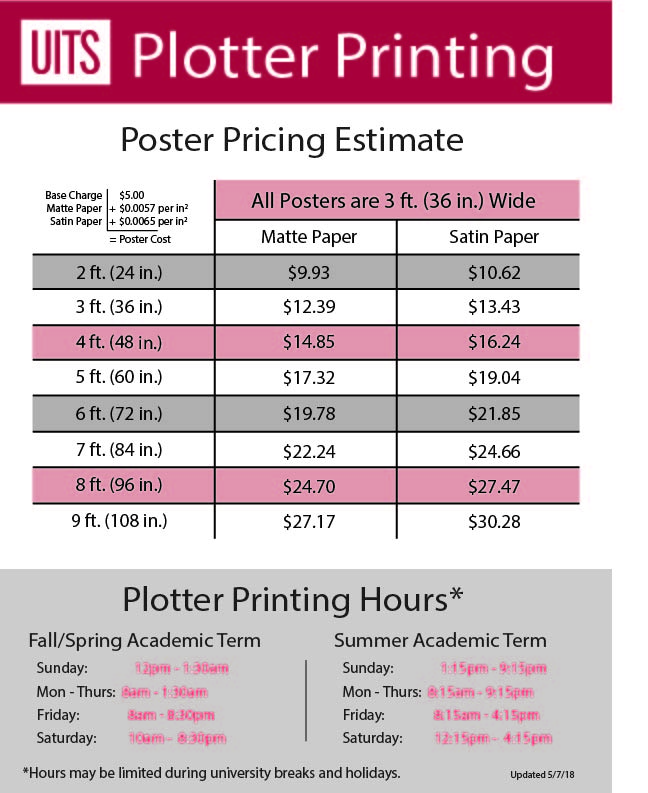
In order to print from the plotter using the money from a grant account, you’ll first need to go to the Support Center in the library with the number of the grant account and a general idea of how much it will cost (see pricing sheet below), and the Support Center will transfer funds from the grant account to the personal account of whoever is sent over to print. This is necessary because the user will be logging into the computer with their personal account rather than with the credentials of the grant account, therefore the print will be released from their personal account rather than the grant account making it necessary to transfer the funds as there is no way to release the job from the grant account.
After transferring the funds at the Support Center, you can go up to the fourth floor where one of our consultants can assist you in getting the posters set up, if necessary, and assist with releasing the print job.